Docs
Micro-controllers, wireless transmission and database

OLED with Blue Pill using STM32CubeIDE
Prerequisites
This project assumes you have already installed STM32CubeIDE. You need to have previously done a basic blink sketch with blue-pill using STM32CubeIDE. I have made a complete video from installing STM32CubeIDE to LED blink program. You can watch it by clicking this link. https://www.youtube.com/watch?v=kXg467nVd_A
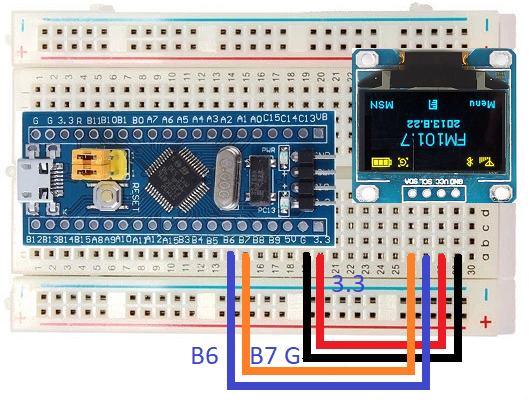
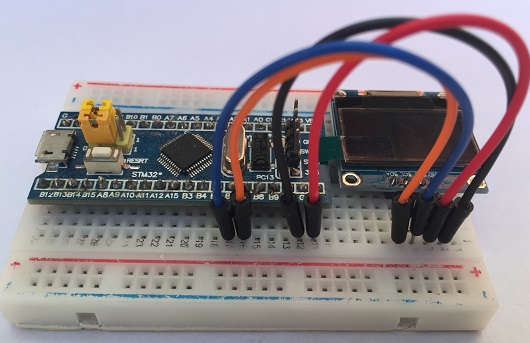
Wiring Diagram
STM32CubeIDE Settings
Click connectivity --> Click I2C1
For I2C select I2C
Configuration --> Parameter Settings
For I2C speed select Fast Mode
Libraries
Inside Core/Inc Folder
fonts.h ssd1306.hInside Core/Src Folder
fonts.c ssd1306.cAdditional code on top of STM32CubeIDE generated code
/* USER CODE BEGIN Includes */
#include "fonts.h"
#include "ssd1306.h"
/* USER CODE END Includes */

  /* USER CODE BEGIN 2 */
  SSD1306_Init();
  char snum[5];

  SSD1306_GotoXY (0,0);
  SSD1306_Puts ("NIZAR", &Font_11x18, 1);
  SSD1306_GotoXY (0, 30);
  SSD1306_Puts ("MOHIDEEN", &Font_11x18, 1);
  SSD1306_UpdateScreen();
  HAL_Delay (1000);

  SSD1306_ScrollRight(0,7);
  HAL_Delay(3000);
  SSD1306_ScrollLeft(0,7);
  HAL_Delay(3000);
  SSD1306_Stopscroll();
  SSD1306_Clear();
  SSD1306_GotoXY (35,0);
  SSD1306_Puts ("SCORE", &Font_11x18, 1);
  /* USER CODE END 2 */


  /* USER CODE BEGIN WHILE */
  while (1)
  {
	for ( int x = 1; x <= 10000 ; x++ )
	{
		itoa(x, snum, 10);
		SSD1306_GotoXY (0, 30);
		SSD1306_Puts ("             ", &Font_16x26, 1);
		SSD1306_UpdateScreen();
		if(x < 10) {
			SSD1306_GotoXY (53, 30);  // 1 DIGIT
		}
		else if (x < 100 ) {
			SSD1306_GotoXY (45, 30);  // 2 DIGITS
		}
		else if (x < 1000 ) {
			SSD1306_GotoXY (37, 30);  // 3 DIGITS
		}
		else {
			SSD1306_GotoXY (30, 30);  // 4 DIGIS
		}
		SSD1306_Puts (snum, &Font_16x26, 1);
		SSD1306_UpdateScreen();
		HAL_Delay (500);
	    }
    /* USER CODE END WHILE */

    /* USER CODE BEGIN 3 */
  }
  /* USER CODE END 3 */